Bike brakes are a crucial component of any bicycle, as they play a vital role in ensuring the safety of the rider. Properly tightened bike brakes are essential for effective stopping power and control, allowing riders to navigate their bikes safely and confidently. Neglecting to tighten your bike brakes can lead to a variety of issues, including reduced stopping power, squeaking or rubbing sounds, and even accidents. Therefore, it is important to understand the significance of tightening your bike brakes and the benefits it brings. Today, JogBike will share with you on how to tighten brakes on a bike.
To tighten brakes on a bike, adjust the brake barrel adjuster or the brake pad position to reduce the lever’s travel and increase braking power.
One of the primary benefits of properly tightened bike brakes is enhanced safety. When your brakes are tightened correctly, you can rely on them to bring your bike to a complete stop when needed. This is especially important when riding in traffic or on steep descents, where quick and efficient braking is crucial.
Tightened brakes also provide better control over your bike, allowing you to maneuver through tight corners or obstacles with ease. By ensuring that your brakes are properly tightened, you can ride with confidence, knowing that you have the ability to stop quickly and safely when necessary.
Understanding the Different Types of Bike Brakes

There are two main types of bike brakes: rim brakes and disc brakes.
- Rim brakes are the most common type and are typically found on road bikes and older models. They work by applying pressure to the rim of the wheel to slow down or stop the bike.
- Disc brakes, on the other hand, use a rotor attached to the wheel hub and calipers that squeeze brake pads onto the rotor to slow down or stop the bike.
Each type of brake has its own advantages and disadvantages. Rim brakes are generally lighter and more affordable than disc brakes. They are also easier to maintain and repair since they have fewer components. However, rim brakes can be less effective in wet or muddy conditions as water or debris on the rim can reduce their stopping power.
Disc brakes, on the other hand, provide consistent and reliable braking performance in all weather conditions. They are also more powerful and require less force to engage. However, disc brakes are typically more expensive and require more maintenance.
Here’s a table outlining the differences between rim brakes and disc brakes:
| Feature | Rim Brakes | Disc Brakes |
|---|---|---|
| Location | Brake pads make contact with the rim surface | Brake pads press on a brake rotor attached to the wheel hub |
| Braking Surface | Rim surface | Rotor surface |
| Stopping Power | Typically less stopping power compared to disc brakes | Provide superior and consistent stopping power |
| Weather Resistance | Performance can be affected by wet or muddy conditions | Less affected by weather conditions, providing reliable performance in various environments |
| Heat Dissipation | Heat is dissipated through the rim, which can lead to overheating on prolonged descents | Heat is dissipated through the rotor, reducing the risk of overheating during long descents |
| Maintenance | Easier maintenance, pads are easily accessible and can be replaced without removing the wheel | Requires occasional rotor truing and may need bleeding for hydraulic systems |
| Modulation | Can lack modulation and tend to be more abrupt | Offer better modulation, allowing precise control over braking force |
| Weight | Generally lighter compared to disc brake systems | Slightly heavier due to the rotor and caliper |
| Cost | Typically more affordable | Initially more expensive due to rotor and caliper components |
| Aerodynamics | Can slightly impact aerodynamics due to the caliper position on the fork and frame | Generally more aerodynamic due to the absence of a brake caliper on the frame and fork |
| Compatibility | Compatible with most traditional road and mountain bikes | Requires compatible frame and fork mounts for the caliper |
| Common Applications | Common on road bikes, some mountain bikes, and hybrids | Common on mountain bikes, cyclocross bikes, road bikes, and increasingly on hybrids |
Both rim brakes and disc brakes have their advantages and are suited for different types of cycling. The choice depends on personal preferences, riding style, and the type of bike being used.
Signs That Your Bike Brakes Need Tightening
It is important to be aware of the signs that your bike brakes need tightening to ensure your safety while riding. One of the most common signs is squeaking or rubbing sounds when you apply the brakes. This can indicate that the brake pads are not properly aligned with the rim or rotor, causing them to rub against it.
Another sign is reduced stopping power, where you notice that it takes longer for your bike to come to a complete stop or that you need to apply more force to the brake levers. This can be caused by loose brake cables or worn brake pads.
Lastly, if you notice that your brake levers feel loose or wobbly when you squeeze them, it may indicate that the brake cables need tightening.
Tools You’ll Need to Tighten Your Bike Brakes
To tighten your bike brakes, you will need a few basic tools. These include Allen wrenches, cable cutters, pliers, and screwdrivers.
- Allen wrenches are used to adjust various components of the brakes, such as brake pad position and cable tension.
- Cable cutters are necessary for trimming excess cable length after tightening the brake cables.
- Pliers can be used to hold cables in place while adjusting tension or to tighten bolts and screws.
- Screwdrivers are needed for adjusting brake pad position and other small adjustments.
Step-by-Step Guide to Tightening Rim Brakes
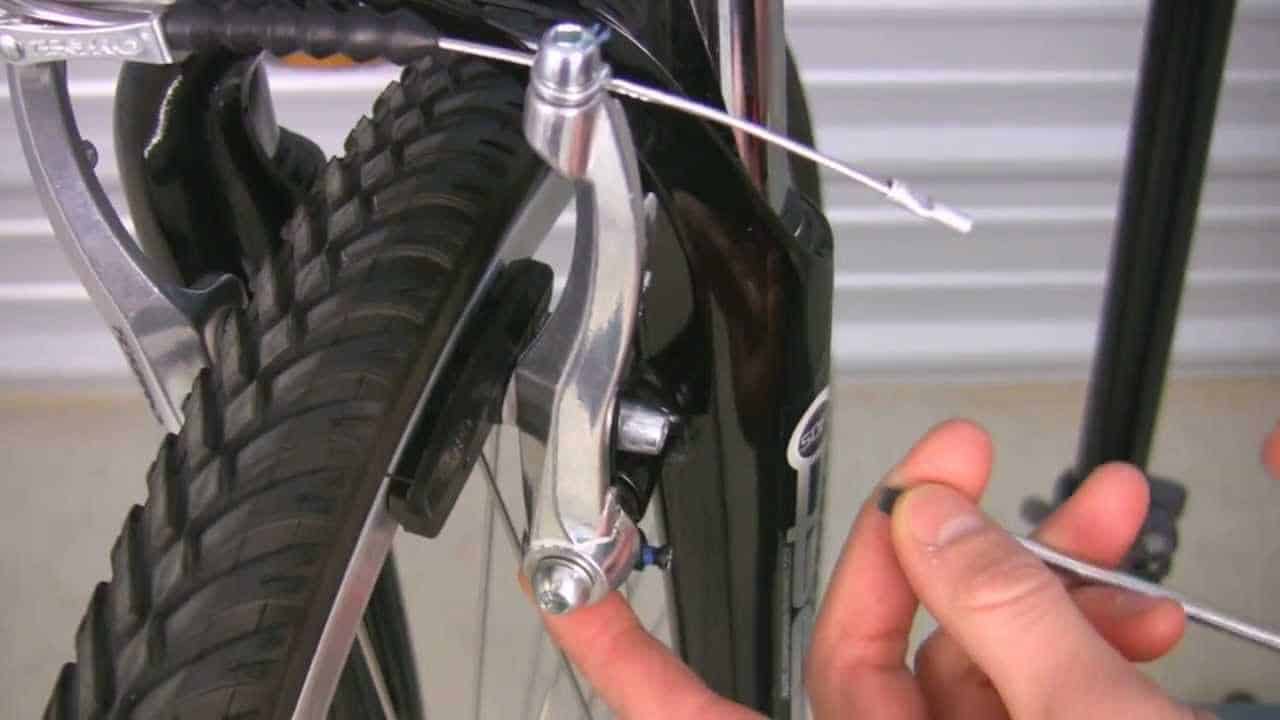
1. Adjusting brake pads: Start by loosening the bolt that holds the brake pad in place using an Allen wrench. Position the pad so that it is aligned with the rim and tighten the bolt securely.
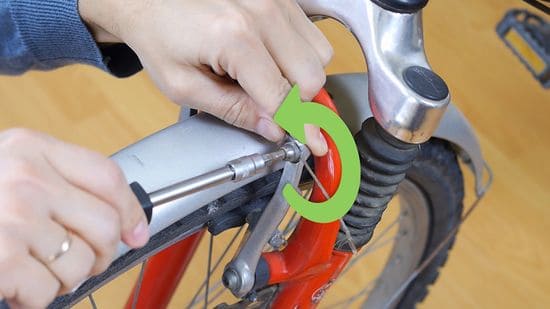
2. Tightening brake cables: Locate the barrel adjuster on the brake lever and turn it clockwise to tighten the cable tension. Test the brakes to ensure that they engage properly and adjust the tension as needed.
3. Checking brake lever tension: Squeeze the brake lever and check for any looseness or wobbliness. If necessary, use pliers to tighten the bolt that holds the brake lever in place.
Step-by-Step Guide to Tightening Disc Brakes

1. Adjusting brake pads: Loosen the bolts that hold the brake pads in place using an Allen wrench. Position the pads so that they are parallel to the rotor and centered within the caliper. Tighten the bolts securely.
2. Tightening brake calipers: Locate the barrel adjuster on the brake lever and turn it clockwise to tighten the caliper. Test the brakes to ensure that they engage properly and adjust the caliper as needed.
3. Checking rotor alignment: Spin the wheel and observe the rotor as it passes through the caliper. If it appears to be rubbing against the pads, use an Allen wrench to adjust the caliper position until there is no rubbing.
Tips for Maintaining Your Bike Brakes for Optimal Performance
To ensure optimal performance and longevity of your bike brakes, regular maintenance is essential. This includes cleaning and lubricating your brakes regularly to remove dirt, debris, and excess moisture that can affect their performance.
It is also important to check your brake pads regularly for wear and replace them when necessary. Worn brake cables should also be replaced promptly to maintain proper tension and responsiveness.
Common Mistakes to Avoid When Tightening Your Bike Brakes
When tightening your bike brakes, there are a few common mistakes that you should avoid. One of these is over-tightening the brake cables, which can lead to reduced stopping power or even damage to the brake system. It is important to find a balance between tightness and flexibility to ensure optimal performance.
Another mistake is misaligning the brake pads, which can cause rubbing or squeaking sounds and reduce braking efficiency.
Lastly, using incorrect tools can lead to stripped bolts or damaged components, so it is important to use the appropriate tools for the job.
Troubleshooting Common Issues with Bike Brakes
If you encounter common issues with your bike brakes, there are a few troubleshooting steps you can take. If you hear squeaking or rubbing sounds, check the alignment of the brake pads and adjust them if necessary.
If your brake levers are sticking or not returning to their original position after releasing them, check for any dirt or debris that may be causing friction and clean the brake system thoroughly. Uneven brake pad wear can be caused by misaligned brake pads or worn brake cables, so it is important to address these issues promptly.
Conclusion: Enjoying a Safe and Smooth Ride with Properly Tightened Bike Brakes
In conclusion, properly tightened bike brakes are essential for safety and control while riding. By understanding the different types of bike brakes, recognizing the signs that your brakes need tightening, and having the necessary tools and knowledge to tighten them correctly, you can enjoy a safe and smooth ride.
Regular maintenance and avoiding common mistakes will ensure optimal performance and longevity of your bike brakes. So, take the time to tighten your bike brakes properly and ride with confidence, knowing that you have the ability to stop quickly and safely when needed.
Originally posted 2023-09-21 04:45:28.